Vastu Gridding Explained: How to Grid a Floor Plan for Vastu
Vastu gridding is the step that turns a plain floor plan into something you can actually evaluate against Vastu principles — a directional zone grid drawn from the plan's centre and aligned to North. This guide explains how gridding works, why the inputs matter more than the math, and how to grid your own plan free at 16 zones without a consultant.
What Vastu gridding actually means
"Gridding" is the process, not the result. It is the act of dividing a floor plan into directional zones — 8, 16 or 32 of them — measured outward from the plan's geometric centre and rotated to the correct North direction. The output of gridding is a zone map: an image of your floor plan with the directional grid drawn over it, so every room can be seen sitting inside a specific zone rather than described in the abstract.
This distinction matters because most Vastu content skips straight to recommendations ("kitchen in the South-East") without explaining how you would know where the South-East of your specific home actually is. Gridding is that missing step.
What gridding needs to work
| Input | Why it is required |
|---|---|
| A traced boundary | Defines the outline the grid is measured against. An inaccurate boundary shifts the centre and every zone with it. |
| A computed centre | The Brahmasthan — the anchor point every zone radiates from. It is the centroid of the traced boundary, not a guess. |
| The North direction | Rotates the whole grid. Get this wrong by even a few degrees at 16 or 32 zones and rooms shift into the wrong sector. |
Everything downstream — which zone a kitchen falls in, what percentage of a bedroom sits in a favourable sector, the eventual Vastu score — depends on these three inputs being right. The gridding math itself is simple geometry; the inputs are where accuracy is won or lost.
Why a direction dialer is enough: for gridding specifically, what matters is the direction relative to the plan you traced, not GPS coordinates. A direction dialer, checked against a compass reading taken on site, is a direct and sufficient way to set North — which is why the Free plan sets it that way.
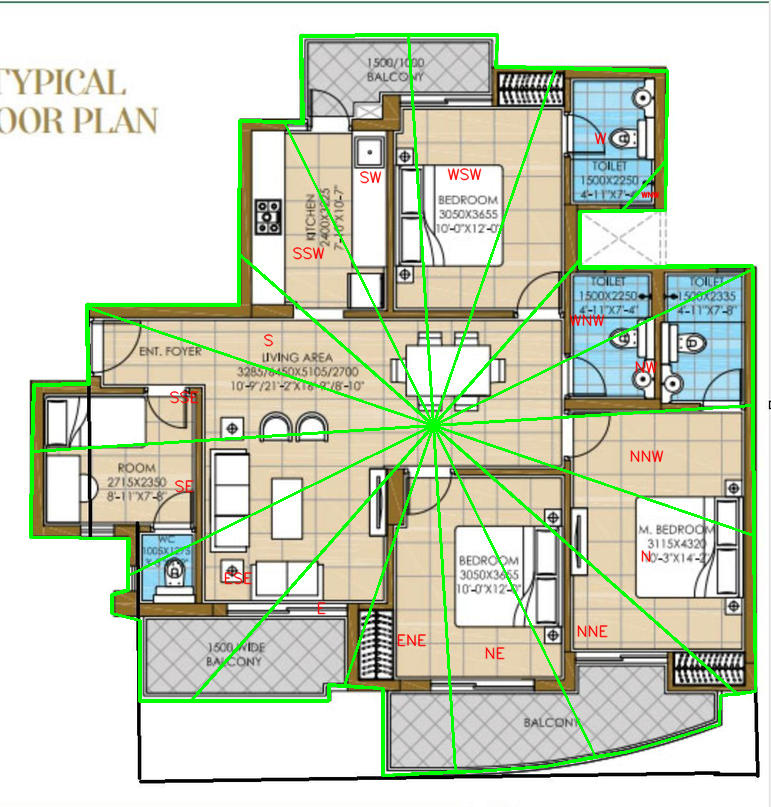
8, 16 and 32-zone gridding compared
| Grid | Sectors | Best for |
|---|---|---|
| 8-zone | N, NE, E, SE, S, SW, W, NW | Quick overview, comparing properties before buying |
| 16-zone | Each of the 8 split into two, 22.5° each | Reading individual rooms with practical precision |
| 32-zone (Vedic / Moderne) | 32 padas of 11.25° each | Entrance placement, interior design and furniture decisions |
The full breakdown of what each level governs and when to use it is in Vastu zones explained: 8, 16 and 32 directional zones.
Gridding by hand vs an online tool
Manual gridding — finding the centroid of an irregular polygon by hand, then drawing 16 sectors at exact angles from it — is doable with graph paper and a protractor, but it is slow and small errors compound. An online gridding tool does the same geometry in seconds and renders it directly onto your uploaded image, which is why it has mostly replaced hand-drawn grids even for people who understand the underlying math.
Generate a free 16-zone grid on your own plan
GetMyVastu offers 16-zone gridding on a Free plan, alongside the paid ones:
- Sign in and activate the Free plan — no payment details needed.
- Upload your floor plan image.
- Trace the boundary by tapping its corners, then close the outline.
- Set North with the direction dialer.
- Generate the analysis and download the report PDF.
The Free plan covers one floor plan per account at the 16-zone level. For the 8 and 32-zone grids, area distribution charts, the Mahavastu Shakti Chakra, a Vastu score and room-wise remedies, the paid plans pick up from there, starting at ₹99 per floor plan.
Try free Vastu gridding
Grid a real floor plan of your own at 16 zones — free, sign in required, no payment details.
Activate the free planCommon gridding mistakes
- Guessing North instead of checking it against a compass or the plan's own North arrow.
- Including open balconies or common corridors in the traced boundary, which pulls the centre off position.
- Forcing an irregular plan into a rectangle, which hides a genuinely relevant missing-corner condition.
- Re-using one grid across multiple floors of a multi-storey home — each floor has its own centre.
Once your grid is generated correctly, the next step is reading it room by room — covered in Floor plan Vastu analysis: how to read your house map correctly.
Frequently asked questions
Is Vastu gridding the same as a Vastu report?
No. Gridding is one step — overlaying the directional zone grid on a floor plan. A full Vastu report goes further: it reads each room against the grid, measures area distribution, and can add a Vastu score, room analysis and remedies. GetMyVastu's Free plan gives you 16-zone gridding and its report PDF for one floor plan; the paid plans add the fuller analysis from ₹99.
Do I need a professional to grid my floor plan?
No. Gridding is a geometry operation — trace the boundary, find the centre, rotate to North, draw the sectors. It can be done by hand or, far faster, with an online tool that performs the same calculation on an uploaded image.
Can I grid a floor plan without knowing the exact North direction?
You can generate a grid without it, but the result will be wrong, because every zone boundary rotates with North. It is worth taking a compass reading on site rather than estimating.